| Tweet |

Custom Search
|
|

|
||
 TM 9-2330-326-14&P
Table 4-1. Unit PMCS (Cont.)
ITEM
INTERVAL
ITEM TO
EQUIPMENT
NO.
M
S
A
T
MI
CHECK/SERVICE
PROCEDURE
NOT READY/
AVAILABLE IF:
3
M
S
A
T
MI
Kingpin
Kingpin is not
a. Inspect kingpin for straightness using a
Every
square.
square. (See Appendix H-13.)
?
6,000
b. Lube and clean kingpin and plate.
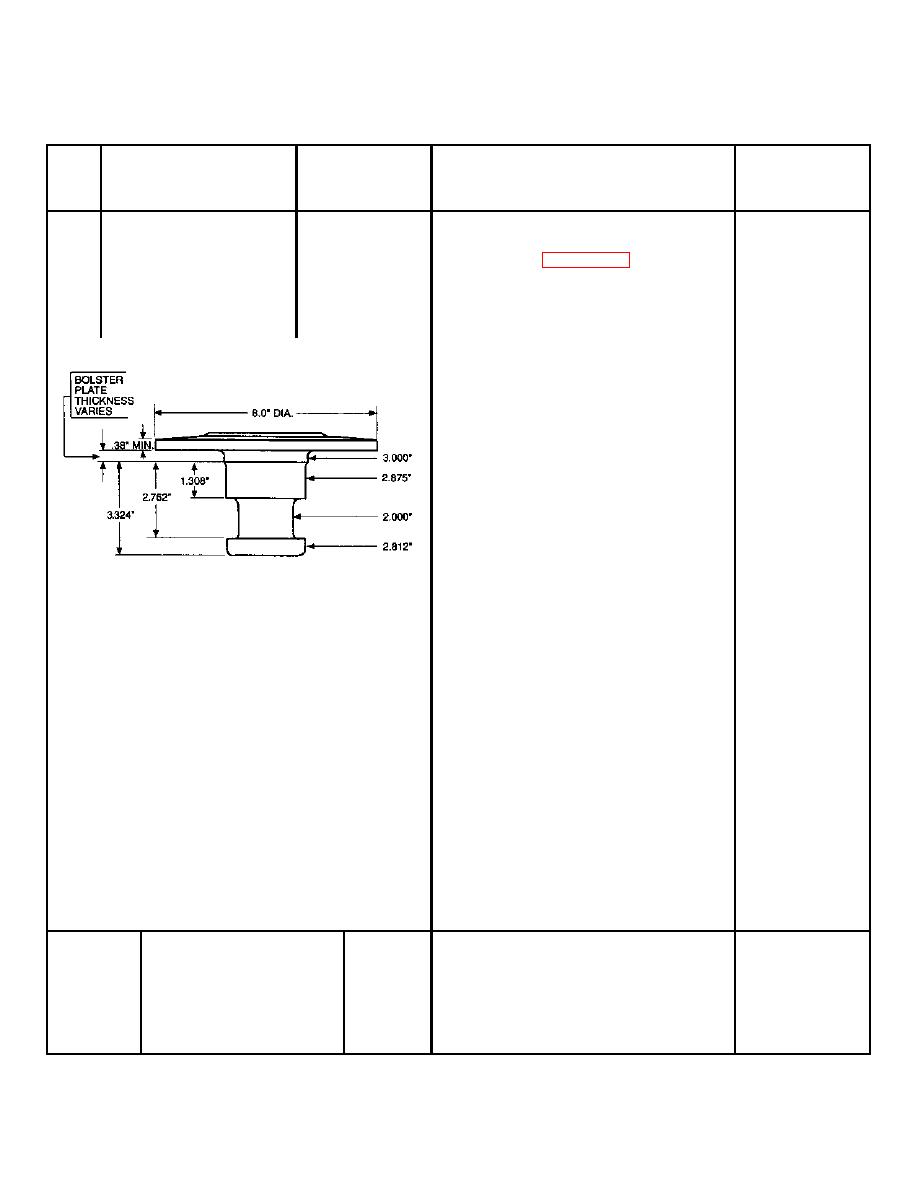
c. Dimensions and wear:
NOTE
Use kingpin gage to check wear,
straightness, and flatness of kingpin and
bolster plate.
1. Length: 3.324 +0.010/ -0.000 in.
(84.43 +0.25/-0.00 mm) (new)
2. Wear: upper diameter at the bolster
Wear meets or
plate should measure:
exceeds
maximum.
New: 2.875 in. (73.03 mm)
Worn: Max. 2.75 in. (69.9 mm)
3. The flat surfaces above and below the
Wear is evident.
locking area are allowed no wear.
4. Fifth wheel locking area on kingpin
Wear meets or
should measure:
exceeds
maximum.
New: 2.000 in. (50.8 mm)
Worn: Max. 1.87 in. (47.5 mm)
5.
Surface damage criteria: Any burrs,
Surface damage
nicks or gouges that exceed 0.12 in.
meets or exceeds
(3.1 mm) in depth, or burrs that
criteria.
exceed this measurement in height
on the upper diameter at bolster plate
and/or at the locking area of kingpin,
should have kingpin replaced. Notify
Direct Support maintenance.
3
Kingpin
6.
No burrs, nicks, or gouges are
Damage meets or
(Cont.)
(Cont.)
allowed on the lower collar area of
exceeds criteria.
the kingpin below the locking area.
Notify Direct Support maintenance
to replace kingpin.
4-5
|
||
 |
||